Mi xperia esta enladrillado…

Pues eso, que lo toquiteas con privilegios y de repente, no arranca.

Síntomas:

  • No arranca
  • Tarda mucho en arrancar
  • No sale el «escritorio»
  • No funcionan las teclas

….

Si tenéis el xperia mini (o cualquier otro xperia) NO DESINSTALEIS EL INICIO DE SONY.

Pues eso toca……¡ a formatear !

😀

Historia del Internet Explorer, IE

Un Breve recorrido por las versiones del IExplorer

Internet Explorer 1

In August 1995, Microsoft releases the Windows 95 Plus! Pack, which includes Internet Explorer 1.

It is interesting to note that Microsoft picked up the version numbering scheme where NCSA Mosaic left off rather than actually christening this version 1.

Internet Explorer 2

In November 1995, Microsoft releases Internet Explorer 2 for both Windows and Mac. This version supports JavaScript, frames, Secure Socket Layer (SSL), cookies and newsgroups (NNTP).

Note that this is actually listed as version 2, but the NCSA Mosaic numbering scheme is now in parentesis.

Internet Explorer 3

In August 1996, Microsoft releases Windows 95 OSR2, which includes Internet Explorer 3. This version supports CSS, the ability to display gifs and jpg files, play MIDI sound files, and introduces the animated Blue e logo.

Internet Explorer 4

While Microsoft releases Internet Explorer 4 in September of 1997, it doesn’t really enter the mainstream until June of 1998 when Microsoft releases Windows 98, which includes Internet Explorer 4, Active Desktop and support for DHTML.

Internet Explorer 5

In May 1999, Microsoft releases Windows 98 Second Edition, which includes Internet Explorer 5. This version supports XML, XSL, and improved CSS functionality.

Internet Explorer 5.5

In September of 2000, Microsoft releases Windows Millennium Edition, which includes Internet Explorer 5.5. While most of the improvements in this version are behind the scenes, it is the first version to ship with 128 bit encryption.

Internet Explorer 6

In October 2001, Microsoft releases Windows XP, which includes Internet Explorer 6. This version introduces auto image resizing and print preview. In Windows XP SP2, Internet Explorer 6 gets a pop-up blocker.

Windows Internet Explorer 7

In late 2006, Microsoft releases a rebranded Windows Internet Explorer 7, which is then included in Windows Vista in January 2007. In addition to the new name, this version supports tabbed browsing, RSS, Page Zoom, Quick Tabs, an Anti-Phishing filter as well as a number of other security protection features.

Tabbed browsing

Internet Explorer 8, released on March 19, 2009, brought improvements with tabbed browsing, visual search, accelerators, a smarter address bar, and use of developer tools. See Ed Bott’s initial review.

Internet Explorer 9

The IE9 platform preview.

>Historia del Internet Explorer, IE

>

Un Breve recorrido por las versiones del IExplorer

Internet Explorer 1

In August 1995, Microsoft releases the Windows 95 Plus! Pack, which includes Internet Explorer 1.

It is interesting to note that Microsoft picked up the version numbering scheme where NCSA Mosaic left off rather than actually christening this version 1.

Internet Explorer 2

In November 1995, Microsoft releases Internet Explorer 2 for both Windows and Mac. This version supports JavaScript, frames, Secure Socket Layer (SSL), cookies and newsgroups (NNTP).

Note that this is actually listed as version 2, but the NCSA Mosaic numbering scheme is now in parentesis.

Internet Explorer 3

In August 1996, Microsoft releases Windows 95 OSR2, which includes Internet Explorer 3. This version supports CSS, the ability to display gifs and jpg files, play MIDI sound files, and introduces the animated Blue e logo.

Internet Explorer 4

While Microsoft releases Internet Explorer 4 in September of 1997, it doesn’t really enter the mainstream until June of 1998 when Microsoft releases Windows 98, which includes Internet Explorer 4, Active Desktop and support for DHTML.

Internet Explorer 5

In May 1999, Microsoft releases Windows 98 Second Edition, which includes Internet Explorer 5. This version supports XML, XSL, and improved CSS functionality.

Internet Explorer 5.5

In September of 2000, Microsoft releases Windows Millennium Edition, which includes Internet Explorer 5.5. While most of the improvements in this version are behind the scenes, it is the first version to ship with 128 bit encryption.

Internet Explorer 6

In October 2001, Microsoft releases Windows XP, which includes Internet Explorer 6. This version introduces auto image resizing and print preview. In Windows XP SP2, Internet Explorer 6 gets a pop-up blocker.

Windows Internet Explorer 7

In late 2006, Microsoft releases a rebranded Windows Internet Explorer 7, which is then included in Windows Vista in January 2007. In addition to the new name, this version supports tabbed browsing, RSS, Page Zoom, Quick Tabs, an Anti-Phishing filter as well as a number of other security protection features.

Tabbed browsing

Internet Explorer 8, released on March 19, 2009, brought improvements with tabbed browsing, visual search, accelerators, a smarter address bar, and use of developer tools. See Ed Bott’s initial review.

Internet Explorer 9

The IE9 platform preview.

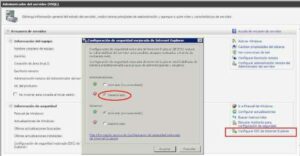
Quitar seguridad mejorada de Internet para descargas, ESC

Problema:

Gracias a la seguridad, sobre todo de los equipo con windows server, no puedo instalarme muchas descargas, así como visitar paginas que cada dos por tres piden agregarlas a la lista de sitios permitidos. Si queremos abrir IE para permitir paginas, programas, cookies y otros puede convertirse en una odisea y constante configuración de los perfiles de seguridad.

Si queremos (solo por un momento corto 😉 eee) abrir la seguridad para poder descargarnos, por ejemplo una .iso de microsoft, haremos este simple gesto.


Solución

Para evitar el molesto mensaje de «su configuración de seguridad actual no permite la descarga de este archivo«

des habilitaremos desde la administración del servidor una opción que esta dentro de un link un poco escondido: Configuracion ESC de internet Explorer.

Simplemente con decirle que este deshabilitada para los administradores es suficiente para nuestro proposito.


Relacionados

Para hacerlo en Windows 8 -> IE ESC W8


Conseguir Root en xPeria mini

Rootear Sony Ericsson Xperia Mini 

Me he comprado un xPeria Mini (he vendido mi iPhone, al irse Jobs, se le acabó la garantia). Lo primero que quiero hacerle es rootearlo. ¿para que? para poder quitarle cosas que vienen de fabrica por ejemplo; no se si lo conseguire.


Tras mucho mirar, de momento no serven los programitas como el famoso 4zRoot, al menos, no me ha funcionado. Sin embargo descubri este procedimiento para rootear el xperia mini o mini pro


Fuente: Android Expert

Rooting your Sony Ericsson Xperia Mini  handset should be a simple and easy process if you have the tutorial. In the following section, we will highlight some of the advantages and disadvantages of rooting alongside the complete tutorial of how you would get this done. You should be keen to follow the tutorial to the letter so that you do not harm your phone.

Sony-Ericsson-Xperia-Mini-Pro-SK17i-Rooting
So, the advantages
  • You will have access to the system files that are used to customize the ROM so that you can use apps that demand system level access.
  • You are able to delete system level apps that are in the phone by default.
Disadvantages: Rooting your Sony Ericsson Xperia Mini Pro SK17i voids its warranty.
Preparations
  • Ensure that you successfully backup all data like SMS, Contacts or other information in your phone.
  • Take note of APN and MMS settings so that you re-configure them after rooting as rooting wipes them off.
  • Ensure you are on version 4.0.A.2.368 Gingerbread 2.3.3. This can be checked through settings, about phone and Firmware version.
  • Ensure you have at least 90% of battery charge as consumption is at maximum.
  • Install the Sony PC Suite on your computer where you have admin privileges. Also ensure all ports are open.
Rooting Sony Ericsson Xperia Mini Pro SK17i process
  1.  Download rooting package that has rooting file and the short fuse app.
  2.  Install the short fuse app on your PC.
  3.  Check th
    at both the rooting and the fastboot.exe files are in the same folder.
  4.  Power OFF your Sony Ericsson Xperia Pro SK17i and connect it to the PC in fastboot mode. The phone USB cable will help.
  5.  Flash the rooting file being careful not to rename it.
  6.  Flashing will complete and you will receive an OK message after which you should disconnect the USB cable.
  7.  Power ON the phone and enable Unknown Sources and USB Debugging. Start the Super One Click app on your PC.
  8.  Click on Root for your phone to be rooted. You will see your phone blinking or it may restart both of which are signs that rooting is in progress.
  9.  Reboot your phone once rooting is complete and you should see Super User app to indicate successful rooting. Click on this app and follow prompts to allow access to the rooting privileges.
———-

Windows Driver Install for using ADB & Fastboot 
You will need to download the SDK which will have the files you need …
The windows drivers are included … just be sure you are getting the Windows version of the SDK X86 or XP … Vista drivers may be different … ??? not sure

1. SDK 1.5 (currently the latest) .. 

— there are two tools in here that you well need …
— a.) ADB.exe
— b.) FastBoot.exe)
2. After downloading the sdk package unzip its contents into a directory
— (easy to remember and short), I suggest: C:SDK_15

3.) For Window path environmental you want to include the path to the 

— directory C:SDK_15tools
— On Windows, right-click on My Computer, and select Properties.
Under the Advanced tab, hit the Environment Variables button, and in the dialog that comes up, double-click on Path (under System Variables). Add the full path to the tools/ directory to the path.
4.) Now you need to get the Windows drivers installed so windows can communicate with the G1 via ADB & FastBoot.

FOR ADB : ================================================== 

— You want to hook you phone to the PC with the USB cable. DO NOT Enable USB access to the SDCard … like you might usually do … Windows will find a report finding new hardware… and will popup the «Found New Hardware Wizard» .
— You will NOT use AUTO but click on «Install from a list or specific location(Advanced)
— Then … Click : Next >
— On the next Screen Click on the box «Include this location in the Search;» and type in the following path … C:SDKSDK_15usb_driverx86 (for XP) and not (AMD64) (this assumes you used the same directory structure settings that I recommended … if you didn’t Shame Upon YOU!! then adjust your entry accordingly … 
Click NEXT … and 
— Patiently wait while Windows install the Windows drivers for the USB/ADB hardware interface … You should receive a successful Completion and then click FINISH

— You are now ready to have you G1 recognized when you connect it with the USB Cable ..
— Should you fail the install then go into the DeviceManager for the PC and Delete the incomplete install driver … and try again .. 

— TEST IT OUT… Click on the Windows Start button || then select RUN from the optionsIn input box type CMD (enter or OK). 
The CMD.exe Command Line Interpreter box will open …
with the phone still connect …. Type adb devices …. If all is good then ADB will
return the Serial Number of the Connected Phone … CONGRATS so far !!!

FOR FASTBOOT : ==================================================

With Phone OFF Press Camera+Power this will enable the FastBoot Utility.
You should see Three (3) Green Androids on Skate Boards …
Press return a few time … and in the middle of the White Screen you should
see Yellow Band with FASTBOOT in Blue center in the screen .. 
— You want to hook you phone to the PC with the USB cable. DO NOT Enable USB access to the SDCard … like you might usually do … Windows will find a report finding new hardware… and will popup the «Found New Hardware Wizard» .
— You will NOT use AUTO but click on «Install from a list or specific location(Advanced)
— Then … Click : Next >
— On the next Screen Click on the box «Include this location in the Search;» and type in the following path … C:SDKSDK_15usb_driverx86 (for XP) and not (AMD64) (this assumes you used the same directory structure settings that I recommended … if you didn’t Shame Upon YOU!! then adjust your entry accordingly … 
Click NEXT … and 
— Patiently wait while Windows install the Windows drivers for the USB/ADB hardware interface … You should receive a successful Completion and then click FINISH 
you are now ready to have you G1 recognized when you connect it with the USB Cable .. 
— Should you fail the install then go into the DeviceManager for the PC and Delete the incomplete install driver (IN THE USB AREA) … and try again ..
— TEST IT OUT… Click on the Windows Start button || then select RUN from the options 
In input box type CMD (enter or OK)
The CMD.exe Command Line Interpreter box will open …
with the phone still connect (BUT NOT SD MOUNTED) ….
Type Fastboot devices ….
If all is good then FASTBOOT will return the :
(Serial Number fastboot)
of the Connected Phone … CONGRATS so far !!!
Link for –> G1 Dream ROOT GUIDE
Link for –> UN-ROOT GUIDE


>Enrredar con Windows Phone 7

>Mi problema es que no tengo Windows Phone ;(  . . . .  buaaaa

¿Que hago para poder cacharrear?

Pues instalarme un maquina virtual con Windows Phone !!!!

>Copias de SQL en red: BackUp a una unidad de red

>Tengo que realizar copias de seguridad de mis BBDD de SQL. Con el asistente de SQL 2005 no hay problema en realizarlas, el asistente de «planes de mantenimiento» es muy eficaz…..pero tiene un problema: No puede realizar los respaldos en una unidad de red !!! solo puede realizarlo en unidades locales.

Mi problema es que no poseo una cabina de almacenamiento FC o similar y tampoco quiero una solución con software que emula a una cabina iSCSI. ¿como puedo realizar estas copias en un destino diferente que no sean las unidades locales?

.
.
.